Network Workstations Installation
Before installing Payroll on network workstations, you must do the following:
- Install and launch Payroll on the server. See Network Server Installation.
- Accept any updates available on the server. See Downloading Payroll.
This topic gives steps to perform the Network - Workstation Only installation. If you're unsure of your install type, see What Install Type Do I Need?.
To setup Payroll on a network workstation:
As a precaution against losing work in other programs, you should shut down all other applications on your computer before beginning your Payroll installation.
To install and activate an Payroll workstation:
You should have already installed Payroll on the server before trying to install Payroll on a workstation. If you have not installed the server yet, see Network Server Installation.
- Do one of the following:
- Install from DVD: Insert the DVD provided in your product shipment into the DVD-ROM drive. Refer to If Payroll DVD Doesn't Start Automatically if necessary.
- Download from Web: Payroll can be downloaded from the MyATX Solution Center. See Downloading Payroll.

Installation: Welcome
- Click Next.

Installation: License Agreement
- Select the I accept the terms in the license agreement radio button to indicate that you have read and agree to the terms of the license agreement; then, click Next.

About the Installation Process
- Click Next.

Installation: Select Your Install Type
- Select the Network option.

Installation: Select Your Install Type (Network)
- Click the Workstation Only option.

Installation: Confirm Your Install Type - Workstation Only
- Click Install.

Installation Complete
- Click Finish.
This completes the Payroll installation process. The Payroll icon is placed on your desktop.
If you receive a Network Setup Not Complete message, click the Help link for Network Troubleshooting Tips.
Workstation Activation
- Double-click the Payroll™ 2024 icon on your desktop. Typically, the system automatically connects the network workstation with the server, and the Payroll splash screen appears and remains on screen for a few seconds.
If the system doesn't automatically locate the server, a Find Network Server dialog box appears. See Finding Your Network Server.
The Activation Codes Dialog Box appears the first time you start the application after installation.

Activation Codes
- Enter the product Activation Code from your Fulfillment Confirmation Slip.
- Click Activate. The product name appears in the Activated Products pane.
- Payroll opens to the Welcome To Payroll dialog box.

- The User Name field defaults to Admin. You must first establish a password for the Admin user in order to access Payroll.
If User Names are not yet created, a message will prompt the Admin user to create users.
Passwords must follow these guidelines:
- 8 - 64 characters
- Spaces are allowed
- (Optional) Select the Remember me check box to have your User Name automatically populated when you launch the application from this workstation.
- Click Login.
- Open your authenticator app to setup multi-factor authentication.
- Scan the QR code provided on-screen.
The second factor backup code displayed at the bottom of the dialog must be copied and saved in order to recover your account.
The second factor backup code is case-sensitive.
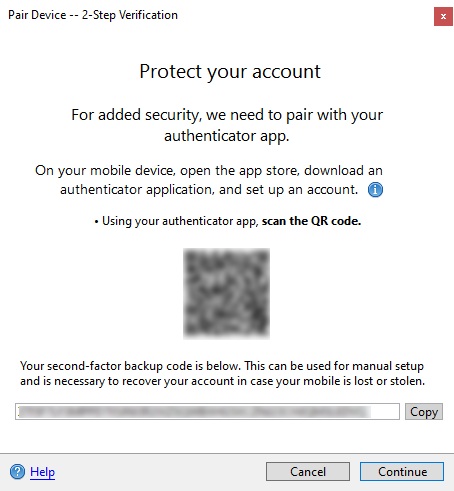
Pair Device - 2-Step Verification
- Click Continue.
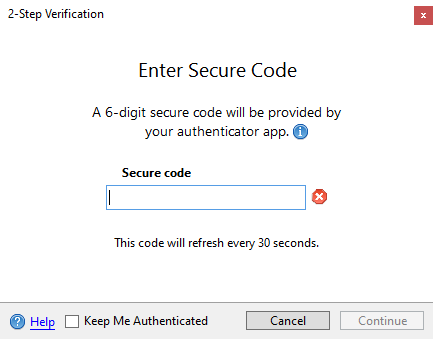
2-Step Verification
- Enter the 6-digit secure code displayed in your authenticator app for Payroll 2024 on [Machine Name] where Machine Name is the name of your computer. Some authenticator apps may also display the application user name.
- Click Continue.
- In the Download Form Updates dialog box, click the Adjust form update settings link.

Download Form Updates dialog box

Updates preferences
- Select the check box(es) next to the package(s) you frequently work with under the Form Updates area of the dialog box.
- Scroll down to the section with the state check boxes; then, select the state(s) you want to include in your form updates.
- Click Apply, and then OK.
- In the Download Form Updates dialog box, click Continue.
- When the Update Results dialog box appears, indicating that the download was successful, click Close.
See Also: